
In this article, we will review how to create a Manjaro Micro SD card and then install it into our Pinephone Pro. But first we will provide an overview and explain why we have decided to NOT install Mobian or Tow Boot.
Why we will not install Mobian or Tow Boot
There is a design flaw in the Pinephone Pro that has caused a lot of problems. Normally, we would want any external booting drive to have priority over the internal Emmc hard drive. In a normal laptop, placing the USB drive as a higher priority than the internal drive is the first step in reflashing the laptop using a Live USB stick. With the previous version of the Pinephone, the external Micro SD card did have priority over the internal Emmc drive. However, a mistake was made with the Pinephone Pro design such that the internal drive was given priority over the external drive. To make matters worse, there is no accessible BIOS to change this flawed Boot Order.
To compensate for the flawed boot order, the boot program for the Emmc drive (called U-boot) was altered to allow us to bypass the internal Emmc drive by first taking off the back cover and removing the battery. Then install the Micro SD card. Then press on the Reset button for a few seconds. Then put the battery back and the back cover back on. Finally press the Power On button for about 10 seconds.
Why Tow Boot was created and why it is a bad idea
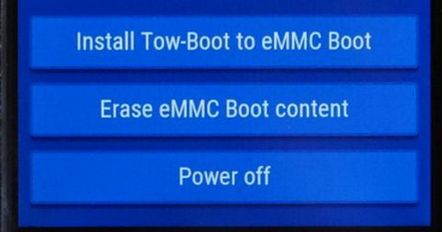
Because this convoluted process was never well documented and because pressing the reset button and or power on button too long might damage the internal Emmc drive, some people came up with the idea of placing a different boot program called Tow Boot on a separate chip called the SPI chip, inside of the Pinephone Pro. Tow Boot then provides a graphical interface which allows us to just click on a button to erase the Emmc Boot content and then install Tow Boot to the Emmc boot.
Mobian thought Tow Boot was such a good idea that on April 3, 2022, they announced that they were changing not just their installation process but also what was contained in their ISO installer. Effective immediately, they removed U Boot from their installer and replaced it with a dependence on Tow Boot (which they assumed would be installed to the separate chip inside of the Pinephone Pro prior to installing Mobian on the Micro SD card).
Here is a quote from the new Mobian instructions: Starting April 3, 2022, Mobian images and installers do not contain device-specific a U-boot boot loader anymore, so users are once required to install tow-boot on their device in case no boot loader is installed yet. These needs to be done before flashing Mobian... Tow-boot is required for the Pine Phone Pro (recommended to install to “SPI”)
Two Wrongs do not make a Right
While this process may seem like a good idea, it is loaded with its own design problems. First, it is not the Debian or even Linux way of doing things. Debian and all other Linux operating systems have always allowed us as users to have the freedom to install the boot program on the same partition as our file system – or to put the boot program on a different partition if we wish.
By removing U boot from their install program, Mobian is taking that choice away from us and forcing us to use Tow Boot.
This leads to the second problem. Once Tow Boot is installed, it becomes a problem trying to install any other Mobile operating system that contains U Boot. This is why Mobian had to remove U Boot from their installer. This in turn is a form of Vendor Lock In.
The ultimate goal is to force all Pinephone Pro distributions, such as Arch Phosh and Manjaro Phosh and Manjaro Plasma Mobile to switch from U boot to a dependence on Tow Boot – effectively creating a Tow Boot monopoly.
There are at least two problems with a Tow Boot monopoly. The first is that novices can and have wiped out their U Boot program on their Emmc drive while failing to properly install Tow Boot to replace it. This can result in the completely inoperable Pinephone Pro.
The second problem is that the ultimate goal of Tow Boot is to add UEFI to the SPI chip. UEFI is not an open source program and is a massive security problem. I have written entire books about the development of UEFI and the danger it presents to users. UEFI is about 10 times bigger than U Boot and there is no need to place such a massive and insecure program on the Pinephone Pro.
Here is a link to an article about the SPI (Serial Peripheral Interface) chip: https://en.wikipedia.org/wiki/Serial_Peripheral_Interface
A SPI is a small flash area you can place a boot loader. A typical x86 systems has firmware (aka BIOS or UEFI) stored in a SPI based Flash chip. When the power-on happens, the processor starts executing at Reset Vector which is pointing to memory-mapped SPI chip where BIOS or UEFI is stored. From here on, the bootstrapping happens when the BIOS or UEFI finishes initialization of platform, loads the boot loader, which then loads the kernel.
The difference between Tow Boot and U Boot is that U boot can act as both the BIOS and Boot Loader while Tow Boot splits this process into a separate UEFI Bios and Tow Boot boot loader. The reason for the split is that the UEFI boot loader must be on a separate partition.
There is a better way
Instead of promoting Tow Boot and UEFI, we should encourage the makers of the Pinephone Pro to return to the correct boot order on their next version of the Pinephone Pro. This will return us to the Linux default of having the boot loader included with each distribution. In the meantime, we should only use distributions that understand and respect our right to decide where we want the boot loader. In my opinion, the boot program should never be on a separate chip. Instead it should always be on the same drive and even the same partition as the file system. This is the most dependable way to make sure that the drive will always boot!
Thankfully, there are still two Pinephone Pro distributions that include U Boot in their installer. These are Arch and Manjaro. Both offer Phosh or Plasma Display Environment options.
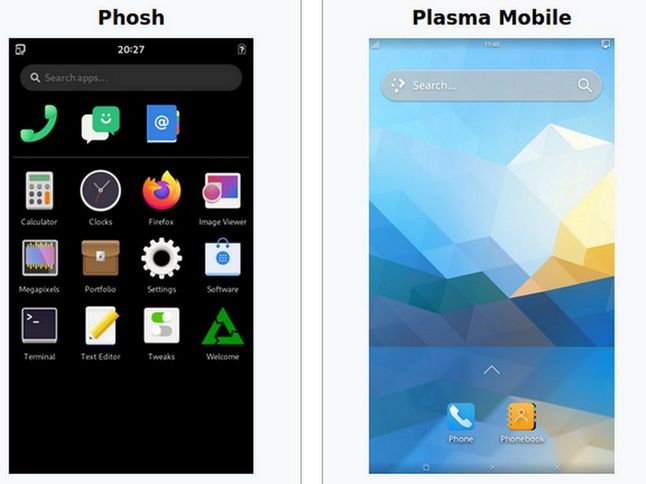
We recommend Manjaro OS because it is better able to install additional programs that any Arch OS. We recommend Phosh because it is faster and has better display layouts in many cases when compared to Plasma Mobile. This makes Manjaro with Phosh the best option for those wanting to set up a convergent system.
Now that we understand why we are using Manjaro Phosh instead of Mobian, let’s review the installation steps.
Overview of Manjaro Phosh Installation Instructions
There are basically 5 steps:
Step 1: Remove the foil to charge the battery
Open the back cover using the small opening in the lower right corner with a small flat head screwdriver or kitchen knife. Then remove the battery and remove the plastic strip that prevents the battery from charging. Then put the battery back and close the lid. Then plug the phone into a real USB C charger to charge the phone battery for a few hours. The Manjaro Plasma Welcome screen will likely come on when you plug the phone into the charger. If you want, you can run through the Manjaro set up screens while the phone is charging. Or you can skip it and do it later.
Step 2 Download Manjaro ARM Phosh for Pinebook Pro
There are two versions of Manjaro ARM Phosh. One is called the Stable version. Here is the link:
https://github.com/manjaro-pinephone/phosh/releases
Sadly, this version has not been updated in more than two months. There have been more than 100 improvements during the past two months. Therefore, I recommend installing the Developmental version. Here is the link:
https://github.com/manjaro-pinephone/phosh-dev/releases
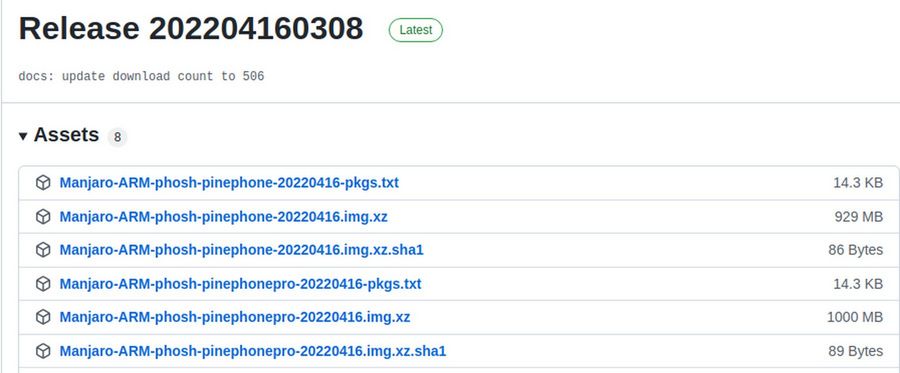
Carefully select the latest Pinephone Pro option (not the Pinephone option). Download the image ending in xz.
Then right click on the Downloaded file and click Extract Here. Be patient. The extraction may take a couple of minutes. Extraction will end with an ISO file which is about 5.6 GB:
Step 3 Use Etcher to create a Live Micro SD
Download Etcher from https://www.balena.io/etcher/
Insert your Micro SD card into the SD-Card Adapter. Then insert the SD card adapter into your laptop SD card slot. Note: If your laptop does not come with an SD card slot, then buy a USB to SD card adapter. They are typically sold on the same rack that has the SD cards and cost $20. Then insert the SD card into the SD card slot and plug the USB end into a USB port on your laptop.
Then double click on Etcher to bring up the start screen. Choose „Flash from file:
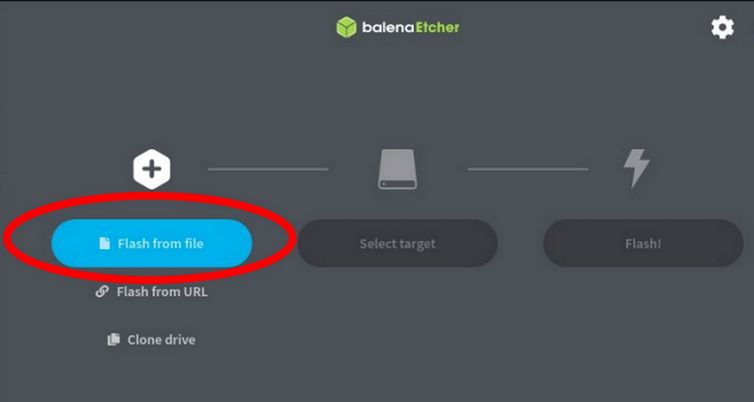
Choose your Manjaro 5.6 GB Image to flash. Then for Target, select your SD Card. The drive will likely be sdb. Then click Flash. It will take about one minute to flash the SD Card. When it is done, remove the SD card or USB adapter. Then close Etcher and take the tiny Micro SD out of the SD adapter.
Step 4: Install the MicroSD Card into the Pinephone Pro
Turn off the Pinephone Pro by holding the power button down for five seconds and then immediately pull out the USB C charger cable. If the Pinephone Pro comes on again, hold the power button down to turn it off again. Wait a few minutes to make sure it is off. Then open the Pinephone Pro back cover and remove the battery. Then carefully push the Micro SD Card carefully into the upper slot on the upper left above the battery box.
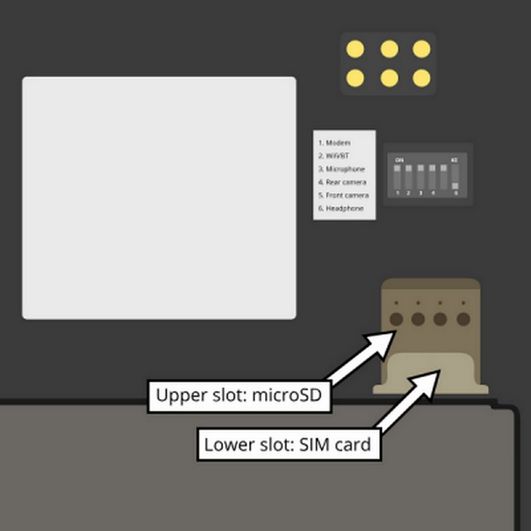
Be careful to avoid bending the pins in the Lower Slot which is intended for a SIM card. The Micro SD card must be pushed all the way in – meaning that the thick lip on the card will be just past the gold pins of the SIM card slot. Then put the battery back. Then put the back cover back on.
Step 5 Boot into Manjaro Phosh by holding the power button down for 10 seconds
It is important to hold the power button down until a couple of seconds after you see the Manjaro start screen. Wait for the Indicator light in the upper left to change from Red to Green.
If you instead boot back into the default operating system, which is Manjaro with Plasma Mobile, then you will need to start over by removing the back cover and the battery. Then waiting a couple of minutes and pushing the Reset button as you put the battery back in. There is no need to remove the Micro SD card. But you should check to make sure it is all the way in. If the process continues to not work, you may have either a bad SD card or simply a card that is too slow. Try a different and faster SD card. You may also have a dead battery. (See below).
A white M on a black screen should appear. You can stop holding down the power button and plug the phone back into the charger. Next a bunch of tiny white and red letters will appear on a black background. After a minute, a black screen will appear with the wrong time. At the bottom of the screen is a white upward pointing arrow. Drag the arrow up with a finger to bring up the password screen.
The default Manjaro password is 123456. Then push the Unlock button. On the first install, you need to run through a couple of install screens. The first is language. Leave it at English and click Next.
Next is Typing. Leave it at English US and click Next. Next is WIFI. Choose your WIFI name. Enter your WIFI password. If it is accepted, a check mark will appear by your WIFI name. Then click Next. The next screen allows you to hide your location. Click on the blue button to turn off location. You can turn it back on again later if you want. Then click Next. The next screen is accounts. Click Skip. The All Done screen will appear. Click the blue button to Start using Manjaro ARM. This will bring up the Manjaro Apps screen. We will cover how to use some of these apps in our next article. To turn off your Pinephone Pro, tap on the tiny top black bar. Then click the Power Off button in the upper right corner. Then click Power Off and Power Off. Then pull the charger out to avoid having it power back on again.
How to Recover from a Dead Battery
One of the most common and most difficult challenges with the Pinephone Pro is recovering from a dead battery. The main cause of a dead battery is users thinking they can plug the USB end of the red cable that comes with the Pinephone Pro into a laptop to charge the phone. Sadly most laptops are not very good at charging and thus drain the phone battery rather than charge it! The best way to avoid this problem is to buy a real charger cable, which should have come with the Pinephone Pro but didn’t.
Once the battery is dead, the phone will not turn on and – even worse – the battery may not charge even if putting the battery on a real charger. To make matters worse, the Pinephone WIKI instructions for recovering from a dead battery are not entirely clear or correct.
Here are a better set of instructions:
First, remove the back cover and remove the battery. If there is an SD card in the card slot, remove that to.
Second, find the tiny round Reset button which is just below the letters RE on the upper left side of the back, just above the battery box. See red circle in this image:
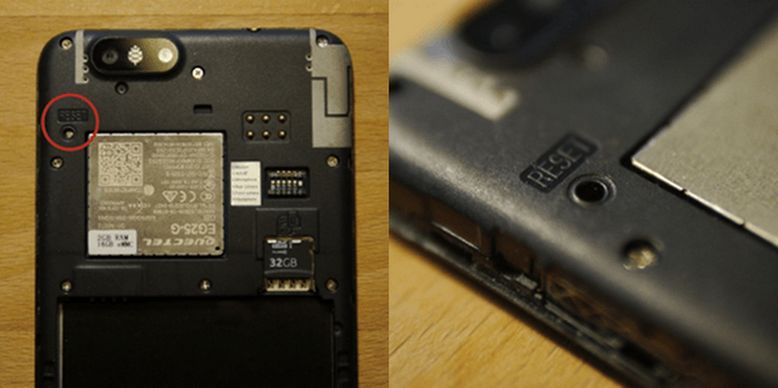
Third, find a tiny pointy screw driver or paper clip small enough to fit into this hole.
Fourth, plug the red cable that came with the Pinephone Pro into the USB C slot and the other end into the USB slot on your laptop. Open the terminal on your laptop and type lsusb. Then press Enter on your laptop keyboard. Lsusb is a command to list all of the USB devices on your laptop. It is likely that the Pinephone Pro device will not be on the list.
Fifth, remove the USB C end of the cable from the Pinephone Pro. Then press down on the RESET button for 10 seconds. Then insert a real charger USB C cable into the Pinephone Pro and insert the battery while holding down the RESET button for 10 more seconds.
Sixth, release the Reset button and let the battery charge for several hours. Check the battery every hour or two to make sure it is not getting too hot. Leave the back case off.
Seventh, remove the battery and the charging cable from the phone. Then press down on the Reset button for 10 seconds. Then plug the charging cable into the phone without the battery while holding down the Reset button for 10 more seconds. Then release the reset button.
After a couple of minutes, remove the charging cable and insert the USB C end of the red cable connected to your laptop. Open a terminal and type lsusb
Then press Enter. You should now see the Pinephone listed as:
Bus 001 Device 005: ID 2207:330c Fuzhou Rockchip Electronics Company RK3399 in Mask ROM mode
Eighth, remove the red USB cable from the phone. While holding the Reset button down, plug in the battery and plug in charger cable while continuing to hold pin down for 10 more seconds. Then let the phone charge for at least 6 hours.
Ninth, remove the charger cable and put the back cover on. With the charging cable NOT connected, turn on the Pinephone by pressing the power on button for 3 seconds. It may appear as if nothing is happening. Wait at least a minute for the start screen to appear. When it appears, log in with the default Manjaro Plasma Mobile password 123456. Click the Settings icon and change it to display the battery power percent. Hopefully, it will be at least 50%. Keep it on the charger until it reads at least 90%. The screen goes black after just one minute of inactivity. To turn on the screen to look at the charging progress, click on the Volume Up button.
Once power is above 90%, unplug the charging cable. Then turn off the phone by pressing the terminal icon to open it. Then type sudo poweroff and press enter. Type your password and press enter. Wait one minute to make sure then phone does not come back on. Then pull off the back cover and remove the battery to install the sd card with Manjaro Phosh.
What’s Next?
In the next article, we will turn the Pinephone Pro back on again to see which operating system it powers on. Hopefully, it will be Manjaro Phosh – allowing us to run through some initial set up steps and install some apps.